|

|
|
| Item | Source | Comments | ||
|---|---|---|---|---|
| Owner's Manuals, service manuals, service | Marantz Corporation | Here are some telephone numbers to call
if you're looking for operation (not service) manuals
for a classic Marantz unit, or if you're looking
to get a unit fixed:
(800) 270-4533 - manualsClick Here To Search EBay for Marantz Manuals |
||
| Service Manuals | A. G. Tannenbaum | Just really great people. I've ordered a number of manuals from them, they're 100% trustworthy and the quality of the copies is very high. Hit their manual indexes under "M" for Marantz data. | ||
| HA-1156 Stereo Decoder IC's, Marantz number HC1000401 | Fistells | They can get replacements - I saved a 2240's FM stereo capability with this part! | ||
| Dial Fuse Lights | Parts Express | The factory specifies an 8 Volt 200 mA lamp, but you can buy the 8 volt
250 mA "fuse type" lamps, part no 070-120. The cost is $.50 for 10-up quantity.
You can also find these on EBay; search for marantz lamps. Make sure you know what
current you're getting - 200 ma or 250 ma.
Note that the extra current requirements can add up, as can the extra heat, which
amounts to a twenty five percent increase; think twice before replacing an
entire set with higher current bulbs. I don't know how much extra current is available
for the lights on a per-unit basis, though I know of no case where this has caused a problem
with the power supply. I have seen melted plastic bezels from using full sets of
250 ma bulbs.
Hint: Marantz has a tendency to wire the fuse panel bulbs in series pairs. So each two bulbs are in series, like an old Christmas lamp string. So if one burns out, they both go out. So a 6-lamp panel that is completely dark most likely has 3 good bulbs still in there. When you replace bulbs, don't put the new bulbs in series with the old good bulbs. The load won't be even, since these aren't the same current ratings (which means that the internal hot resistance is different), and so you'll have a non-equal voltage divider which in turn causes a variation in brightness. In this example, you could put two of the old bulbs in series with each other, and then two sets of new bulbs, which leaves one old one. Or else replace them all (a better idea, anyway... the interval to the next required replacement will likely be much longer!) |
||
| Indicator bi-pin lamps | Marantz Corporation | The factory specifies bi-pin lamps rated at 6.3V 40 mA. Marantz still sells those for a price ($3 - $5 each) WARNING! The FM stereo light requires a lower current lamp than the other indicators in circuits using the HC1000401 PLL IC. Using the same bi-pin lamp overloads, and can blow out, the stereo decoder IC. That is why I had to replace the HA-1156 mentioned above! I do not have a source or details on the current requirements for the bi-pin stereo indicator lamps. If it is the stereo indicator you need, be sure to tell the Marantz representative that! |
||
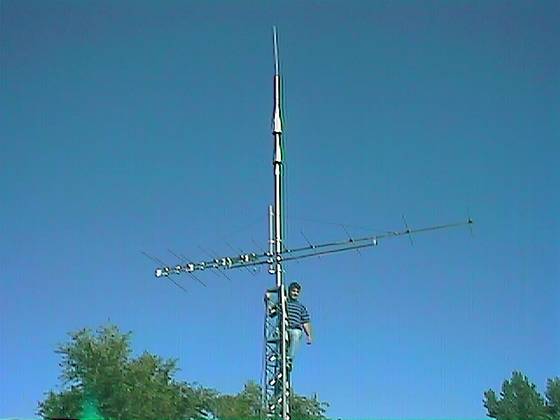
| Finally, an FM Antenna that is really worthy of our babies! | C Crane Company |
|
||
| Those Pesky Speaker Protection Circuits | N/a |
The relays in Marantz receivers (and likely the amplifiers) of the 2245 vintage and later
often had a problem with corrosion on the silver contacts used in their
manufacture. The most horrendous of these was the intermittent loss of signal
from the amps to the speakers due to corrosion on the contacts of the protection
relay. The receivers had a protection relay between the amp outputs and the
speaker terminals. When the power switch was pushed there was initially no
output to the speakers. After the power amp was on for about 2 seconds the relay
switched on and the speakers were heard.
When the corrosion was present the signal would intermittently cease for very short periods. The loss of signal was so short that it was infuriating. Cleaning or replacing the relay fixed the problem in most instances. Thanks to: Marty Toomajian How to clean those relay contacts: "Wet or Dry" paper--available in 2400 grit, 1200 grit, 600 grit. The finer grit is better, don't use anything courser than the 600 grit. 600 is readily available at any hardware store, Lowes', home shop, etc. 1200 and 2400 are more likely to be obtained at NAPA or an automotive paint store (Dupont, Sherwin Williams, or whatever). Most of the time, the available size is going to be about 8"x11", but sometimes it comes smaller. Cost is about 50 cents/sheet give or take, with the finer grits being slightly higher. Take a narrow strip (1/4" approx, cut or torn), fold it in half and crease it with grit sides facing out, and then separate the contacts, slip it between, and withdraw letting the contact provide its' own pressure. Repeat if needed, then clean any dust and grit out with a strip of paper towel, or or other lint free material. This is important, since the slightest non-conductive dust on the newly cleaned and polished surfaces can easily prevent electrical contact, especially at the low voltage/current values we are usually dealing with. The fineness and thin aspect of this improvised "paper cleaning file" keeps the points in proper relationship while being used, so distortion or flattening of the contact point is minimal, if any. Tip courtesy of T. E. Spillers |
||
| General Electronic Restoration Tips | N/a |
Our Marantz gear has, in general, withstood the test of time quite
well. However, time has, and is, modifying these units every day,
and they move further away from the original design specifications
as a result. What can we do? Should we do anything?
I think we should. And we can. My aim here is to provide some general tips that are aimed at electronics types. If you're not technically sophisticated, just skip this tip - you don't want to electrocute yourself, or ruin your prized Marantz.
--Ben
|
||
| Replacing the small bulbs (stereo, Dolby, dial pointer, etc) | n/a |
Often, it is difficult to obtain correct replacements for the
smaller incandescent bulbs used in older Marantz units. This tip
describes an way around the problem for bulbs that match physically
but not electrically.
Something you can do to replace the smaller bulbs is series a couple
of bulbs that aren't the right amperage, but the right physical
configuration. For instance, if you have trouble getting the right
bulb for the dial pointer because of current (ma) requirements, you
can often take two higher current bulbs that are physically correct,
and series them, mounting one in the designed location, and the other
somewhere handy inside the chassis where it won't show. The trick is
to make sure that the resulting current requirement is less
than that of the factory-specified bulb.
As an initial rule of thumb, if you series two bulbs, the bulbs will probably draw less than 1/2 of the rated operating current; if you series three, less than 1/3rd, and so on. This is generally true when the sum of the lamp voltage ratings is higher than that of the applied voltage across the whole series string. Even when that is true, because the resistance of a hot filament is nonlinear and varies with the design of the filament, you must measure the current drawn by the series string and actually verify that it is under the rating for the Marantz unit. In at least one case - stereo indicators - setting up a situation where the current draw is more than the rated amount will cause damage to the receiver (destruction of the stereo decoder IC in this specific case.) So measure! For example, recently I replaced a stereo indicator that was supposed to be 30 ma/12v with a series of two 8v/40ma bulbs. The sum of the rated voltages is 16v, so my rule of thumb that says the current draw would be 1/2 or less than the rating (40 ma) comes into play. I put one on the indicator, and the other I mounted behind the indicator panel, inside the chassis. When I measured them, the current draw at 12v was only 16 ma, the bulb was more than bright enough, *and* the voltage across each bulb was only 6v, so they'll likely last much longer than they would if used in "normal" 8v service. As a side benefit, the load on the stereo IC's lamp driver circuit was decreased from 30 ma to 18 ma, and that IC is now likely to last longer as well.
|
||
| Rock EQ with Separates | n/a |
Rock music fan? Me too. You know what the "Loudness" contour does?
It kicks up the amplitude of the low bass and higher treble signal
components when the level of the music is low. The idea is to
increase the levels just enough to match the amount that your ears
lose sensitivity to those tones as the overall level of the music
drops. So, as you turn the music down, the parts you would normally
begin to lose track of remain perceptible to you. Which is fine.
Preamps are designed to apply more and more
loudness contour as you turn the volume down, or less and less
as you turn it up, however you want to think of it.
If you're like most modern rockers, you're likely to be a fan of significantly enhanced bass. Bass is a big part of modern music. And bass from Marantz gear is heavenly! Well, if you have a separate amplifier and preamplifier, and the amplifier has its own gain controls (like the 170dc, 300dc and so on,) then here's what to do:
Here's why: The loudness setting on the preamp has less and less effect as you turn the preamp's gain up. So, with the amp turned up, and possibly the source signal turned up as well, you don't need to advance the preamp gain that far to get a high output. And, with the preamp gain setting lower, the loudness contour is further engaged, hence stronger bass (and treble) enhancement. Of course, you can push this even further with the bass equalization controls on the preamp. And conversely, if you think the loudness on your preamp is a little too much, turn down the gain on the power amp, and turn up the gain on the preamp further. It'll significantly reduce the amount of loudness compensation that the preamp applies, great for classical music or any situation where you want to hear the music closer to how it was mixed to the recording (which I note wryly is very seldom what the original artist had in mind, but does usually reflect the producer and/or engineer's vision of the final product...) Enjoy! --Ben |
||